Learn how to repair tongue and groove porch flooring effectively with this detailed step-by-step guide. From assessing the damage to selecting the right materials, we’ll walk you through the process to restore your porch to its former glory.
Are you facing issues with your tongue and groove porch flooring? Has it started to show signs of wear and tear, with cracks, splits, or rot becoming evident? Don’t worry, you’re not alone. Porch flooring is constantly exposed to the elements, making it susceptible to damage over time.
However, with the right knowledge and tools, you can restore your porch flooring and ensure its longevity. In this guide, we will take you through the step-by-step process of repairing tongue and groove porch flooring, enabling you to tackle the task with confidence.
Assessing the Damage
Contents
- 0.1 Assessing the Damage
- 0.2 Gathering the Tools and Materials
- 0.3 How To Repair Tongue And Groove Porch Flooring?
- 0.4 What Are The Common Issues With Tongue And Groove Porch Flooring?
- 0.5 How long does it take to repair tongue and groove porch flooring?
- 1 FAQs about How To Repair Tongue And Groove Porch Flooring
- 2 Final Thoughts on How To Repair Tongue And Groove Porch Flooring
The first step in repairing tongue and groove porch flooring is to assess the extent of the damage. Here’s how you can do it:
- Visual Inspection: Carefully examine the porch flooring and identify any visible signs of damage, such as cracks, splits, or rot. Take note of the affected areas to plan your repair strategy.
- Probe the Wood: Use a screwdriver or awl to gently probe the damaged areas. Soft or spongy wood indicates rot, while resistance signifies intact wood. This will help you determine the severity of the damage and identify areas that require immediate attention.
- Check for Loose Boards: Look for any loose or unstable boards that may need to be secured or replaced. Pay close attention to the edges and joints of the tongue and groove flooring.
Gathering the Tools and Materials
Before you begin the repair process, gather the necessary tools and materials. Here’s a list of what you’ll need:
- Safety goggles and gloves
- Hammer
- Pry bar or crowbar
- Circular saw or handsaw
- Chisel
- Screwdriver
- Wood filler or epoxy resin
- Replacement boards
- Nails or screws
- Exterior-grade wood glue
- Sandpaper
- Paint or stain (optional)
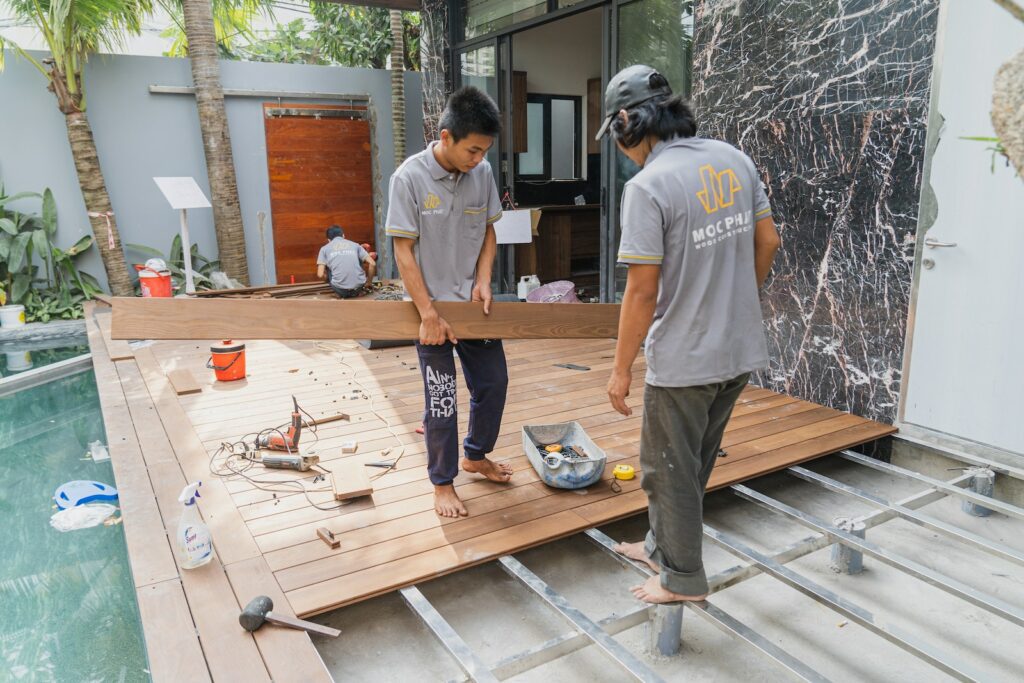
How To Repair Tongue And Groove Porch Flooring?
Tongue and groove porch flooring is a popular choice due to its durability and aesthetic appeal, but over time, it can suffer from cracks, splits, or rot. By learning how to repair and maintain your porch flooring, you can extend its lifespan and enjoy a beautiful and functional outdoor space. Whether you’re a seasoned DIY enthusiast or a beginner, this guide will provide you with the knowledge and confidence to tackle the repairs effectively.
Step-by-Step Repair Process
Now that you have assessed the damage and gathered the required tools and materials, it’s time to get to work. Follow these steps to repair your tongue and groove porch flooring effectively:
1. Remove Damaged Boards
Start by removing the damaged boards from the porch flooring. Follow these steps:
- Use a pry bar or crowbar to gently lift the damaged boards. Take care not to damage the surrounding boards in the process.
- If the boards are nailed in, use a hammer to carefully remove the nails. For screws, use a screwdriver to unscrew them.
- Once the damaged boards are removed, clean the area by removing any debris or loose nails.
2. Prepare Replacement Boards
Measure the dimensions of the removed boards and cut the replacement boards accordingly using a circular saw or handsaw. Ensure that the new boards match the size and profile of the existing tongue and groove porch flooring.
3. Install Replacement Boards
Follow these steps to install the replacement boards:
- Apply exterior-grade wood glue to the tongue and groove of the replacement boards.
- Insert the replacement boards into the existing groove of the adjacent boards at a slight angle.
- Use a hammer and a scrap piece of wood to tap the new boards firmly into place.
- Secure the boards further by nailing or screwing them down, ensuring that the fasteners are countersunk.
4. Repair Cracks and Splits
Address any cracks or splits in the remaining porch flooring using wood filler or epoxy resin. Here’s how:
- Clean the cracks or splits using a chisel to remove any loose or damaged wood.
- Follow the manufacturer’s instructions to prepare the wood filler or epoxy resin.
- Apply the filler or resin to the cracks or splits, smoothing it out with a putty knife or scraper.
- Allow it to dry completely, and then sand the repaired area until it’s smooth and level with the surrounding flooring.
5. Sand and Finish
Once the repairs are complete, sand the entire porch flooring to create a smooth and even surface. Start with a coarse-grit sandpaper and gradually move to finer grits for a polished finish. If desired, apply a fresh coat of paint or stain to protect the wood and enhance its appearance.
What Are The Common Issues With Tongue And Groove Porch Flooring?
Common Issues with Tongue and Groove Porch Flooring:
- Cracks and Splits: Over time, tongue and groove porch flooring may develop cracks and splits due to various factors such as natural expansion and contraction of the wood, extreme temperature changes, or moisture fluctuations. These cracks and splits not only compromise the aesthetics of the flooring but can also lead to further damage if left unaddressed.
- Rot and Decay: Porch flooring is exposed to the elements, making it susceptible to moisture intrusion. If the flooring lacks proper ventilation or if water accumulates, it can lead to rot and decay. Fungal growth can also contribute to the deterioration of the wood. Rot and decay weaken the structural integrity of the flooring, potentially compromising its safety.
- Unevenness and Warping: Uneven settling of the porch foundation, moisture imbalances, or poor installation can cause tongue and groove porch flooring to become uneven or warped. This can create an unappealing and potentially hazardous surface, as it may lead to tripping or stumbling. Additionally, it affects the stability and overall appearance of the flooring.
- Loose or Damaged Boards: Regular use and exposure to harsh weather conditions can result in loose or damaged boards in tongue and groove porch flooring. Loose boards not only detract from the stability of the flooring but can also pose safety risks. Damaged boards may have splinters or significant wear and tear, affecting the overall integrity of the porch flooring.
- Pest Infestation: Wood-boring insects, rodents, and other pests can infest tongue and groove porch flooring, especially if proper preventive measures are not in place. These unwanted guests can cause structural damage to the wood, leading to weakened flooring. Additionally, pest infestation can create health and safety concerns for homeowners.
It is essential to address these common issues promptly to maintain the beauty, functionality, and longevity of tongue and groove porch flooring.
How long does it take to repair tongue and groove porch flooring?
The time required to repair tongue and groove porch flooring can vary depending on several factors, including the extent of the damage, the size of the porch, the availability of tools and materials, and the individual’s level of experience and skill. While each repair project is unique, here are some general guidelines regarding the timeframe for repairing tongue and groove porch flooring:
- Assessing the Damage: This initial step typically takes around 1 to 2 hours. It involves visually inspecting the porch flooring, identifying the issues, and determining the extent of the damage. Thorough assessment allows for better planning and more accurate repair timelines.
- Gathering Tools and Materials: The time required to gather the necessary tools and materials can range from 1 to 2 days. This includes identifying the specific tools needed for the repairs, such as hammers, saws, drills, and sandpaper, and procuring them from local suppliers or online stores.
- Repairing Cracks, Splits, and Small Damages: Repairing minor cracks, splits, and small damages typically takes around 1 to 2 days. The process involves filling the cracks and splits with wood filler or epoxy resin, allowing them to dry, and sanding the repaired areas to achieve a smooth finish.
- Replacing Damaged Boards: If there are damaged boards that need to be replaced, the repair timeframe can range from 1 to 3 days. This includes removing the damaged boards, preparing replacement boards to match the existing tongue and groove structure, and securely installing them in place.
- Sanding and Finishing: After the repairs are complete, sanding the porch flooring to achieve a smooth and even surface can take an additional 1 to 2 days, depending on the size of the porch. Applying a protective finish, such as varnish or sealant, may require an additional day or two, considering the drying time between coats.
It’s important to note that these timelines are approximate and can vary based on individual circumstances. Larger porches or more extensive damage may require more time to complete the repairs. Additionally, factors such as weather conditions or the availability of assistance can also influence the overall repair timeframe.
FAQs about How To Repair Tongue And Groove Porch Flooring
Q: How long does it take to repair tongue and groove porch flooring?
A: The duration of the repair process depends on the extent of the damage and the size of the porch. On average, it can take a few days to complete the repairs, including drying time for fillers or resin.
Q: Can I repair a single damaged board without replacing the entire porch flooring?
A: Yes, it’s possible to repair a single damaged board by following a similar process. However, ensure that the replacement board matches the existing tongue and groove profile for a seamless repair.
Final Thoughts on How To Repair Tongue And Groove Porch Flooring
Learning how to repair tongue and groove porch flooring effectively make it a manageable task that can significantly extend the lifespan of your porch and restore its beauty. By following the steps outlined in this guide, you can confidently undertake the repair process.
Remember to assess the damage, gather the necessary tools and materials, and follow the step-by-step process for effective results. With proper maintenance and care, your porch flooring will continue to provide a welcoming and durable surface for years to come.