Do you want to know how to repair screen on porch? If you have a porch with a damaged screen, it can be frustrating to deal with bugs and debris constantly entering your outdoor space. Fortunately, repairing a screen on a porch is a simple process that can be done without professional help. In this article, we’ll go over the steps you need to take to repair a screen on your porch, so you can enjoy your outdoor space again.
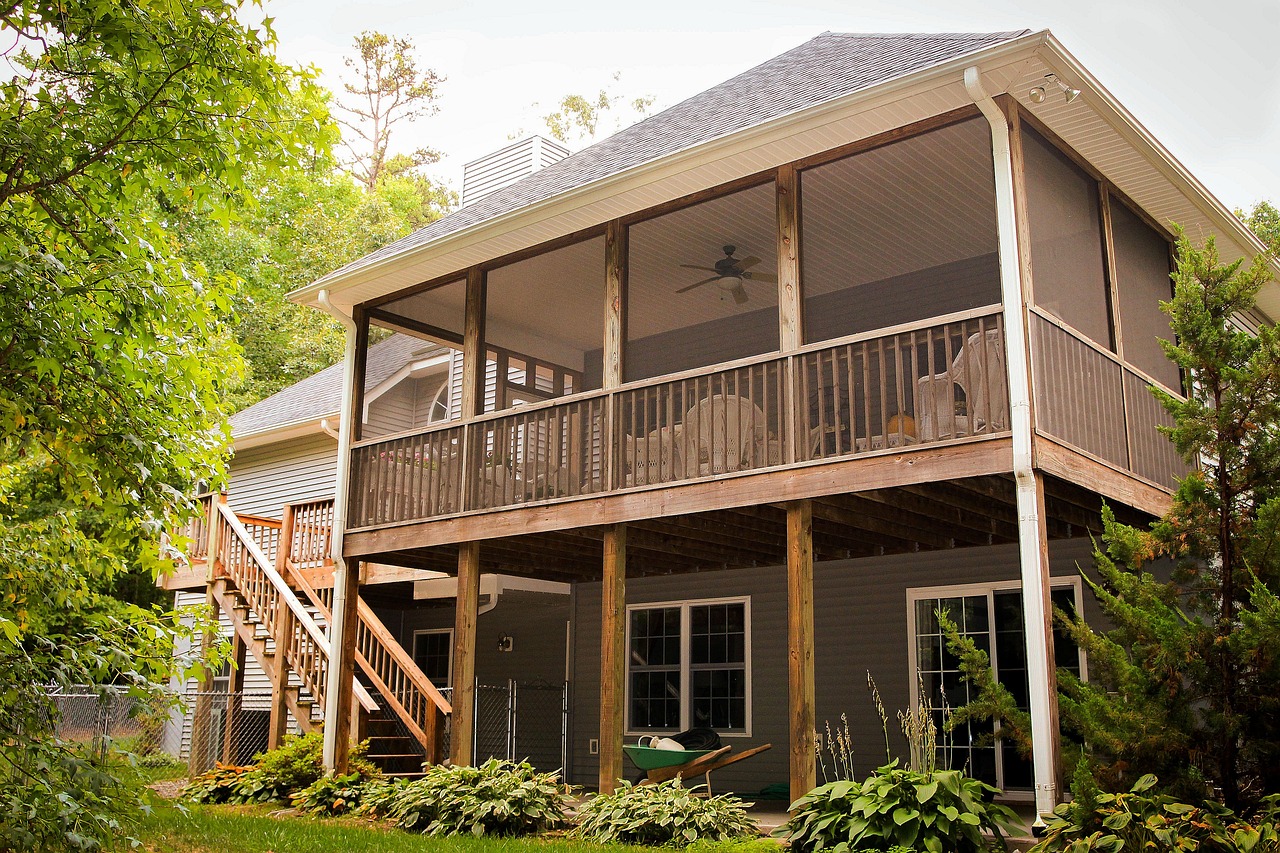
How to repair screen on porch – Porch screen repair tips
Contents
- 1 How to repair screen on porch – Porch screen repair tips
- 2 What tools do I need to repair a porch screen?
- 3 How to replace a damaged porch screen?
- 4 Can I repair a porch screen myself?
- 5 How much does it cost to repair a porch screen?
- 6 How to fix holes in a porch screen?
- 7 Where to buy materials to repair a porch screen?
- 8 How to repair a porch screen without replacing it?
- 9 How to prevent porch screens from getting damaged?
- 10 How long does it take to repair a porch screen?
- 11 How to fix a sagging porch screen?
- 12 How to repair a porch screen door?
- 13 How to clean a porch screen before repairing it?
- 14 Removable screens are easier to install
- 15 Aluminum screen is cheaper than fiberglass
- 16 Pet-resistant screens are more expensive
- 17 Final thoughts on how to repair screen on porch
Step 1: Remove the damaged screen – The first step is to remove the damaged screen from the porch. This can be done by removing any staples or screws that are holding the screen in place.
Step 2: Measure the screen – After removing the damaged screen, you’ll need to measure the dimensions of the opening where the screen will be installed. Make sure to measure accurately to ensure that the new screen will fit properly.
Step 3: Install the new screen – Once you have measured the opening, you can install the new screen. Start by attaching the screen to the top of the opening, and then use a screen roller tool to press the screen into the groove on all sides. Trim any excess screen material once the screen is securely in place.
Step 4: Secure the screen – After installing the new screen, secure it in place using staples or screws. Make sure to place staples or screws every 2-3 inches to ensure the screen is firmly attached.
What tools do I need to repair a porch screen?
What tools do I need to repair a porch screen?
If you’re planning to repair a porch screen on your own, you will need to have the right tools needed for repairing your porch screen to ensure a successful outcome. Some of the most essential tools you will need include a screen roller tool, a utility knife, and a staple gun. The screen roller tool will help you to press the screen into the groove, while the utility knife will allow you to cut the screen to the right size.
The staple gun will be used to attach the screen securely to the porch frame. Other useful tools to have on hand include a measuring tape, a flat-head screwdriver, and pliers. These tools will come in handy when measuring the screen and removing staples or screws from the porch frame.
It’s important to note that the specific tools you need may vary depending on the type of porch screen you are repairing. For instance, if you are repairing a metal screen, you may need to use wire cutters to trim the screen to size.
Similarly, if you are working with a wooden porch frame, you may need to use a hammer and nails to attach the new screen. In any case, be sure to check the specific instructions for your porch screen repair project to ensure you have all the necessary tools and equipment on hand.
How to replace a damaged porch screen?
Replacing a damaged porch screen is a simple process that can be done without professional help. First, you will need to remove the damaged screen by carefully pulling out any staples or screws that are holding it in place. Next, measure the dimensions of the opening where the screen will be installed to ensure the new screen fits properly. Cut the new screen material to size using a utility knife and then attach it to the porch frame using a staple gun or screws. Finally, trim any excess screen material using the utility knife to ensure a neat and tidy finish.
If you’re unsure about how to repair porch screen without professional help, there are many online resources and tutorials available to guide you through the process. Additionally, you can consult with staff at your local hardware store for advice and guidance on how to complete the repair successfully. With the right tools and a bit of patience, replacing a damaged porch screen can be a quick and easy DIY project that will save you money and help you enjoy your outdoor space to the fullest.
Can I repair a porch screen myself?
Yes, you can repair a porch screen yourself, even if you have little to no experience with DIY projects. The process involves removing the damaged screen material, measuring and cutting a replacement screen to size, and attaching it securely to the porch frame using a staple gun or screws.
While the process may seem daunting at first, there are many resources available online that provide step-by-step instructions and helpful tips for completing the repair successfully. With a bit of patience and the right tools on hand, you can easily repair a porch screen yourself, saving money and improving the functionality of your outdoor space.
If you’re interested in repairing your porch screen yourself, there are many DIY resources available online to guide you through the process. From instructional videos to step-by-step guides, these resources can provide you with the knowledge and confidence you need to tackle the repair on your own.
Additionally, DIY porch screen repair can be a fun and rewarding project that allows you to learn new skills and improve your home. By taking the time to repair your porch screen yourself, you can enjoy the satisfaction of a job well done and a porch that looks and functions as good as new.
How much does it cost to repair a porch screen?
The cost to repair a porch screen can vary depending on a few factors, including the size of the porch, the extent of the damage, and the cost of materials in your area. On average, however, you can expect to spend between $50 and $150 to repair a porch screen, including the cost of new screen material, any necessary tools, and professional labor if you choose to hire someone to complete the repair for you.
If you choose to repair the screen yourself, you may be able to save money on labor costs, but you will still need to factor in the cost of materials and any necessary tools.
Fortunately, there are many affordable porch screen repair options available that can help you save money on this home improvement project. For instance, you may be able to find discounted screen material at your local hardware store or online, or you could consider purchasing a screen repair kit that includes all the necessary tools and materials at a lower cost than buying them separately.
Additionally, DIY porch screen repair can be a cost-effective solution that allows you to save money on professional labor costs while improving the functionality and appearance of your porch. With a bit of research and a willingness to put in some work, you can easily repair a porch screen on a budget.
How to fix holes in a porch screen?
Fixing holes in a porch screen is a simple process that can be completed in just a few easy steps. To begin, clean the damaged area of the screen with soap and water to remove any dirt or debris that may be trapped in the hole. Next, cut a small piece of screen material that is slightly larger than the hole and place it over the damaged area.
Using a needle and thread, sew the patch in place, making sure to securely attach it to the existing screen material. Once the patch is in place, trim any excess screen material using scissors to ensure a neat and tidy finish.
If you’re looking for easy porch screen repair steps, consider purchasing a screen repair kit that includes all the necessary materials and tools. These kits typically include adhesive patches that can be quickly and easily applied to the damaged area of the screen, eliminating the need for sewing or other complicated techniques.
Simply clean the damaged area, peel off the backing of the patch, and place it over the hole. Press down firmly to ensure a secure attachment, and then trim any excess material using scissors. With a screen repair kit on hand, fixing holes in a porch screen can be a quick and easy DIY project that anyone can complete.
Where to buy materials to repair a porch screen?
When it comes to buying materials to repair a porch screen, there are several options available depending on your needs and preferences. One of the most convenient options is to purchase materials online, as many hardware and home improvement retailers offer a wide selection of screen material, tools, and repair kits that can be shipped directly to your home. Online shopping can also allow you to compare prices and read customer reviews to ensure that you’re getting the best possible value for your money.
Alternatively, you may prefer to purchase materials to repair your porch screen in person at a local hardware store or home improvement center. These retailers typically offer a variety of screen materials in different colors and sizes, as well as the tools and accessories necessary to complete the repair.
Additionally, shopping in person can allow you to speak with knowledgeable staff members who can provide helpful advice and answer any questions you may have about the repair process. No matter where you choose to buy your materials, be sure to compare prices and quality to ensure that you’re getting the best possible value for your money.
How to repair a porch screen without replacing it?
If your porch screen is damaged but not completely beyond repair, you may be able to fix it without replacing the entire screen. One quick porch screen repair technique is to use a needle and thread to sew a patch over the damaged area.
To do this, cut a piece of screen material that is slightly larger than the hole or tear, and then use a needle and thread to carefully stitch the patch onto the existing screen material. Be sure to use a strong, durable thread that will securely hold the patch in place, and take care to make your stitches as neat and even as possible.
Another method for repairing a porch screen without replacing it is to use adhesive patches or tape. Screen repair kits are readily available at most hardware stores and home improvement centers, and typically include adhesive patches that can be applied directly to the damaged area of the screen.
To use these patches, simply clean the damaged area of the screen with soap and water, and then peel off the backing of the patch and apply it over the hole or tear. Press down firmly to ensure a secure attachment, and then trim any excess material using scissors. With these quick and easy porch screen repair techniques, you can save time and money while restoring the functionality and appearance of your porch screen.
How to prevent porch screens from getting damaged?
Preventing porch screens from getting damaged in the first place can help you avoid the need for costly repairs down the line. One of the most effective ways to prevent damage to porch screens is to keep them clean and free of debris.
Regularly sweeping or vacuuming the porch area can help remove leaves, dirt, and other debris that can become trapped in the screen and cause damage over time. Additionally, trimming back any nearby trees or shrubs can help reduce the risk of branches or other debris coming into contact with the screen.
Another way to prevent porch screens from getting damaged is to reinforce them with a protective layer of mesh or wire. Some homeowners choose to install a layer of hardware cloth or chicken wire over their porch screens to provide an added layer of protection against damage from pets, wildlife, or falling debris.
Additionally, investing in high-quality screen material and using proper installation techniques can help ensure that your porch screens are durable and long-lasting. By taking these proactive steps to prevent damage to your porch screens, you can enjoy a comfortable and inviting outdoor living space for years to come.
How long does it take to repair a porch screen?
The length of time it takes to repair a porch screen can vary depending on the extent of the damage and the repair method you choose to use. Minor tears or holes in the screen can often be repaired quickly and easily using adhesive patches or sewing techniques, and may take as little as 15-30 minutes to complete.
However, more extensive damage such as large tears or holes may require more time and effort to repair, especially if you need to replace a larger section of the screen material.
If you’re repairing the porch screen yourself, it’s important to take your time and work carefully to ensure that the repair is done correctly. Rushing through the repair process can lead to mistakes or a less effective repair, which may require you to start the process over again.
On the other hand, if you hire a professional to repair your porch screen, the process may be completed more quickly and efficiently, as the professional will have the necessary tools and expertise to complete the repair as quickly as possible. Ultimately, the length of time it takes to repair a porch screen will depend on a variety of factors, but with the right tools and techniques, you can restore your porch screen to its former condition in no time.
How to fix a sagging porch screen?
If your porch screen is sagging, it may be due to a damaged or weakened screen frame. To fix a sagging porch screen, you will need to inspect the frame to determine the source of the problem. If the frame is damaged, you may need to repair or replace it in order to restore the screen’s tension and prevent it from sagging.
In some cases, simply tightening the screws or nails that hold the frame in place can help restore tension to the screen and fix the sagging problem.
Another possible cause of a sagging porch screen is that the screen material has become stretched or warped over time. In this case, you may need to replace the screen material in order to restore the tension and prevent sagging. To replace the screen material, remove the old material from the frame, being careful not to damage the frame itself.
Then, cut a new piece of screen material that is slightly larger than the frame and use a screen spline tool to secure it in place. Work your way around the frame, carefully stretching the screen material and ensuring that it is securely held in place by the spline. With these porch screen repair methods, you can fix a sagging porch screen and restore the functionality and appearance of your outdoor living space.
How to repair a porch screen door?
Repairing a porch screen door can be a bit more complex than repairing a regular porch screen, but with the right tools and techniques, it is possible to fix many common problems. One of the most common issues with porch screen doors is that the door itself may become detached from the frame, either due to damage or wear and tear over time.
To fix this problem, you will need to remove the door from the frame and reattach it using screws or hinges. Be sure to use the proper tools and hardware to secure the door in place and ensure that it swings smoothly and securely.
Another common issue with porch screen doors is that the screen material itself may become damaged or torn. To repair a torn screen, you will need to remove the damaged material from the door frame and replace it with a new piece of screen material. Be sure to measure the door frame carefully and cut the new material to size before securing it in place with a spline tool.
If the damage is minor, you may be able to repair it using adhesive patches or sewing techniques. With a little bit of patience and attention to detail, you can easily repair a porch screen door and enjoy the benefits of a fully functional and attractive outdoor living space.
How to clean a porch screen before repairing it?
Cleaning a porch screen before repairing it is an essential step to ensure a successful repair job. Dirt and grime can accumulate on the screen over time, making it difficult to see through and hindering the repair process. To clean the screen, first, remove any loose debris or leaves from the surface. You can use a soft-bristled brush or a vacuum cleaner to remove these particles.
Then, mix a solution of warm water and mild detergent in a bucket. Dip a clean, soft cloth into the solution and gently scrub the screen, starting from the top and working your way down. Be careful not to apply too much pressure as it can damage the screen. Rinse the screen thoroughly with clean water and let it dry completely before attempting any repairs.
After cleaning the porch screen, it’s important to inspect it for any damages or tears. Look closely at the entire screen, checking for any holes or weak spots. If you find any damages, use a screen patch or replace the entire screen if the damage is severe.
It’s crucial to repair any damages before they worsen, as it can compromise the entire screen and may require a full replacement. Once the screen is clean and repaired, it’s ready to be re-installed back onto the porch. Regular cleaning and maintenance can help prolong the lifespan of the porch screen, saving you money and time in the long run.
Removable screens are easier to install
Removable screens can be installed on a porch in a variety of ways, including stapling them to the framing. This method is more cost-effective and easier to install. A stapling method is also a better choice if you plan to paint or stain the porch in the future. However, you should keep in mind that you cannot remove the screen once it is installed.
To install the screen, start by assembling the frame. It should be constructed of 1x4s or 1x3s. It should be connected to the frame using waterproof glue or end nails. Next, stretch the screen material tightly along the framing and staple it into place. Repeat this process for the sides and bottom. Once attached, trim the excess screening with a utility knife. Finally, cover the openings with a wood strip or batten to disguise the seams.
Removable screens are also easier to install on a porch than permanent systems. A removable screen is more flexible and convenient for different weather conditions. You can also install them on a wall to eliminate the need for a door. You can install these screens on a porch that spans almost 20 feet. In addition, they require less columns to install. They can also be used for a three-season porch if you want to install space heaters.
The traditional method of installing a screen on a porch is still common in older homes. Screens are typically installed with small nails or staples, and the screens are stretched taut between them. This method requires careful measuring, and the screens can sag over time. Another disadvantage of this method is that it is time-consuming and often results in a noticeable sag in the screen after a few months. You also have to remove the screens from the battens when you need to replace or repair them.
If you want to make the porch more private, consider installing retractable screens. These screens can be installed on two porch spaces – one connected to the deck – and they connect the two spaces. They can be opened to create one large space and can be lowered to create a separate space. In addition to creating privacy and limiting sunlight, they are also more attractive than traditional screens. The screens can be any size you choose.
Removable screens are easier to install than fixed screens. You can easily install them yourself if you have a handy tool. You need a tool to roll the screen fabric. Once you have rolled the screen fabric, you can screw the strips into the 2×4 rails. To hide the screws used to secure the screen to the base strips, you can use cap strips to cover them. You can also use wide cap trim to cover the base strips.
Aluminum screen is cheaper than fiberglass
If you want to install a screen for your porch, you can find a variety of options at home centers. You can find aluminum mesh in black and gray color to match your house. You can also get bronze or brown-toned sun-shading fabrics. Home centers carry pre-measured rolls of screen material. When you replace your screen, make sure to use a center support if your porch’s screen is taller than a couple of feet.
When choosing a screen, you can choose a fabric made of fiberglass or aluminum. Fiberglass screens are the most common because they are affordable and can be removed easily from the frame. Aluminum screens are more durable and have permanent grooves. Fiberglass is more durable and sag-resistant than other screen materials, and it comes in a variety of colors and transparencies. When choosing a fabric, make sure to consider its durability and flexibility before making your decision.
If you want to install a screen for your porch, be sure to choose a material that is resistant to moisture and wind. A coated screen will provide more protection and look great for years to come. However, if your porch has a high amount of traffic, you should consider using fiberglass instead. The difference in cost and durability will be obvious after installation. And you’ll be happy with the outcome in the end.
While it may seem like a small project, replacing a screen can make a big impact on the appearance of your home. Though the job is relatively simple, it’s still best to consult a professional. The latter option is more expensive and requires large sheets of screen material, and careful finishing. This option is best suited for a smaller project. It’s easier to make an estimate online and choose the screen material that’s right for your porch.
If you want to replace the screen on your porch, you can choose between fiberglass and aluminum. Aluminum is cheaper and more durable than fiberglass, but it can dent or stretch when hit. Unlike fiberglass, aluminum is available in a variety of colors. And you can get it in a wide range of colors to match your house’s decor. However, it doesn’t come with as many colors as fiberglass does. Choosing fiberglass is a better choice for most projects.
The price difference between fiberglass and aluminum screen is considerable. Fiberglass will typically cost about 25 to 150 dollars, while aluminum is a little cheaper. Fiberglass won’t rust or corrode like metal, but it will require more frequent repairs than aluminum. You’ll need to replace a fiberglass screen sooner than an aluminum one. You can buy fiberglass screens at home improvement centers for less than $50. If you’re on a budget, however, you can get a Marvin screen for about $200. These screens are easy to install and can come assembled. You can also lock the screen in place with a screen lock.
Pet-resistant screens are more expensive
If you are looking for an inexpensive way to screen in your porch, you can purchase a DIY porch screen kit for under $450. DIY kits usually include the screening material and the spline, which is a length of vinyl cording that fixes the screening material into the porch frame. Other materials you will need to complete the installation are a straight edge knife, a ruler and scissors. Some DIY kits include cleaning supplies as well.
The first thing to remember is that a pet-resistant screen will be more expensive than a regular mesh screen. Pet-resistant screens are generally made of vinyl-coated polyester that is about seven times stronger than ordinary screens. A 96-inch-by-50-foot roll of pet-resistant porch screen will cost around $270. You can purchase different types of pet-resistant porch screens to suit your home’s design and your budget.
Despite the higher cost of pet-resistant porch screens, they will keep out debris and airborne pollutants from your porch. A pet-resistant porch screen will also keep out insects and other animals from the house. These screens are recommended for porches that are open to the elements. Fortunately, these materials are also available in large rolls. If you want to buy a pet-resistant porch screen, you should look for a high-quality, durable screen.
If you have a dog or other animal that likes to chew things, you may consider investing in a pet-resistant porch screen. These screens are made of a strong polyester yarn and are 400-pound-breaking-strength. They will also prevent gnats and sand flies from entering the house. The mesh is made of a finer weave, so they will be less likely to be shredded by your pet.
In addition to the higher cost, a pet-resistant porch screen will last for years, so it is worthwhile to spend a little more money on a high-quality screen. After all, replacing inferior screens can add up quickly. If you have a pool or patio, investing in a pet-resistant screen will be worth the cost. It will protect your pool from pests and minimize the risk of catching fleas.
The most cost-effective way to screen a porch is to invest in fiberglass screen. Fiberglass is flexible and easier to install than aluminum screens and will not crease. Fiberglass porch screens will typically cost around $4 or $5 per square foot. Aluminum porch screens cost about the same. You should invest in two extra sets of screens, one for the porch and another for the balcony. The cost of installing the porch screen will vary depending on the size of the patio.
While fiberglass porch screens are more expensive, they’re worth it in the long run. While fiberglass screens tend to be more flexible than their counterparts, they’re still easy to tear and damaged by children or animals. This material is also very easy to repair. You won’t have to worry about replacing a damaged screen. And because fiberglass screens can withstand rough treatment, you can easily replace them when needed.
Final thoughts on how to repair screen on porch
We showed you how to repair screen on porch and much more. Repairing a screen on a porch is a simple process that can be done without professional help. By following the steps outlined above, you can have your screen ready to use in no time.
With your newly repaired porch screen, you’ll be able to enjoy your outdoor space again without the annoyance of bugs and debris. So, don’t hesitate to tackle this DIY project and repair the screen on your porch today!